Getting Started
This guide will get you up and running with QueryDesk. It covers your deployment options, then walks through the core features using the pre-configured Devhub database that ships with every new instance.
You may notice references to Devhub throughout, which is the collection of tools that includes QueryDesk.
Deployment options
Cloud hosted
All cloud hosted installations are isolated and are single tenant. You can sign up for a free trial at querydesk.com.
You will be assigned a unique subdomain, to customize it please reach out to [email protected].
Self hosted
QueryDesk is also available to be self hosted and is free for up to 5 users.
It currently is available as a helm chart, you can find the instructions here: https://github.com/devhub-tools/helm-charts/blob/main/charts/devhub/README.md.
If you need a different deployment method, please reach out to [email protected].
Bring your own cloud
If you would like us to manage your installation in your own cloud, please reach out to [email protected].
First look at QueryDesk
After successfully completing sign-up, you will land on the Databases page. A database called Devhub is already connected and ready to use. While the Devhub database is the database for your instance of QueryDesk, you can use it to test queries and the major features outlined in this guide. No additional setup is required to start exploring.
Keeping access restricted to the Devhub database is essential, as unrestricted access could allow anyone to modify access and approval rules for the entire product.
As the Devhub database is your QueryDesk instance, you want to avoid doing anything destructive. See previous warning.

The Devhub database is a live PostgreSQL instance. You can use it to run queries, test approval flows, and verify audit logging before connecting your own databases.
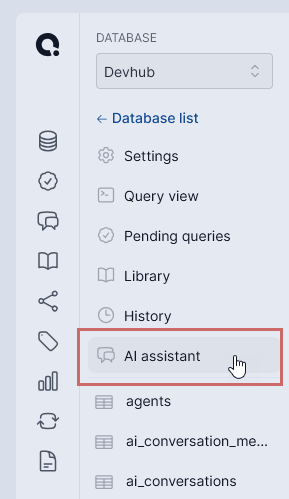
The left navigation gives you access to everything in QueryDesk:
| Item | Description |
|---|---|
| Databases | Your connected databases and the starting point for running queries |
| Pending queries | Queries waiting for approval before execution |
| AI assistant | Query generation using an AI model you connect via API key |
| Query library | Your saved private queries |
| Shared queries | Queries shared across your organization |
| Labels | Tags for organizing queries in the Query library only |
| Dashboards | Data views built from your database connections |
| Workflows | Automated multi-step processes combining queries, API calls, and notifications |
| Audit log | A complete record of every query run against every connected database |
Connect to the Devhub database
On the Databases page, click Connect on the Devhub entry. This opens the query interface.
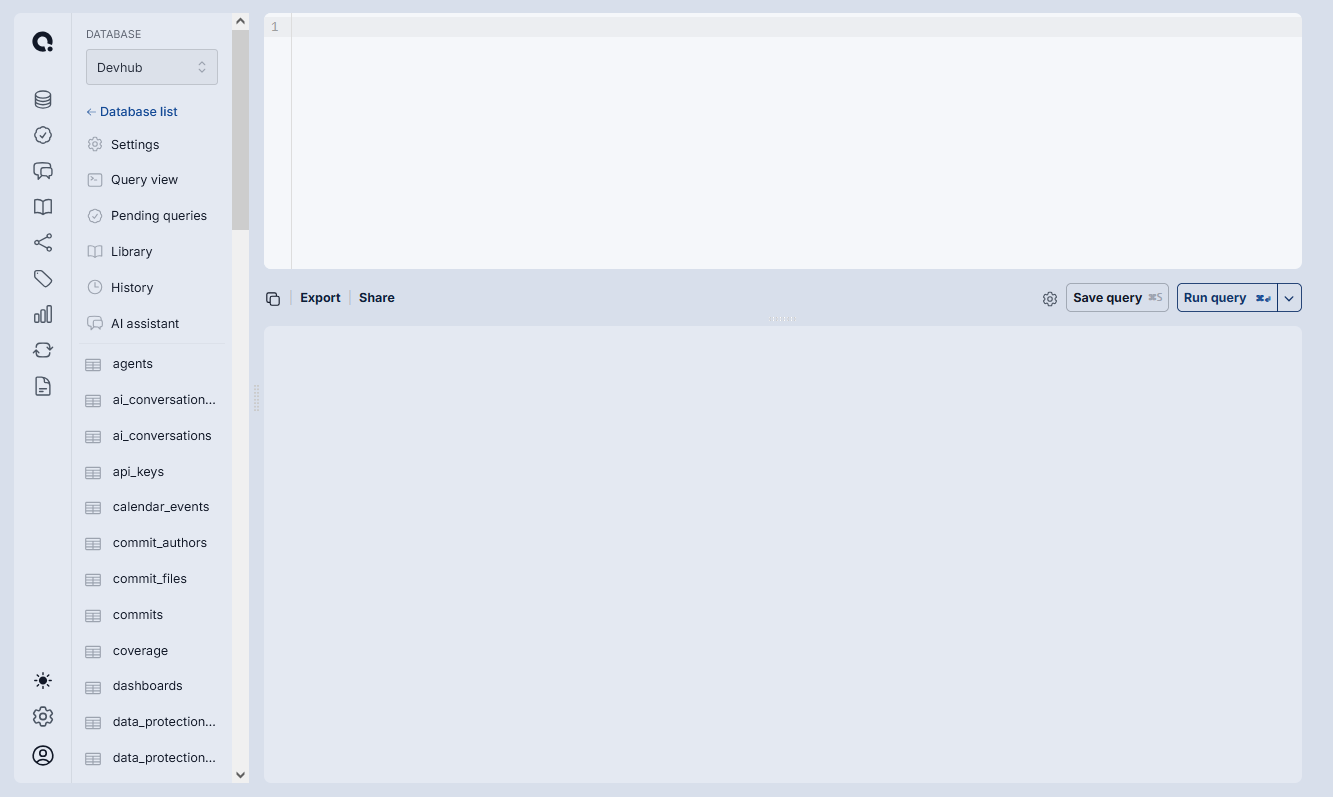
The interface has three main areas:
- Left panel: lists all tables in the connected database. Click any table name to load a
SELECTquery for that table automatically. - Query pane: where you write or edit SQL.
- Results pane: where query output appears after execution.
Run a query
Type a query in the query pane, or click a table name in the left panel to generate one. Click Run query to execute it. For example, this will return every column from the organizations table, along with basic details about each one.
SELECT
  column_name,
  data_type,
  is_nullable,
  column_default
FROM information_schema.columns
WHERE table_schema = 'public'
  AND table_name = 'organizations'
ORDER BY ordinal_position;
Results appear in the results pane below. From there, you can:
- Click Export to download the results as a CSV file.
- Click Share to generate a shareable link.
Query options
The dropdown arrow next to Run query exposes additional settings before execution:
| Option | Description |
|---|---|
| Default limit | Caps the number of rows returned. Also adjustable via the gear icon in the command bar. |
| Timeout (seconds) | Stops the query if it hasn't completed within the specified time. Also adjustable via the gear icon in the command bar. |
| Run as | Selects which database credential the query runs under. |
| Analyze query | Generates a query plan instead of returning results. When enabled, the action button changes to Analyze query, and results are replaced with the query analysis. |
Saving a query
Click Save query to open a dialog where you can name the query and optionally mark it as private. Private queries are only visible to you. Queries saved without the private flag (default) are accessible to your team through the Query library.
Don't know SQL? Bring your own AI model and QueryDesk will make it schema-aware for your databases, so your team can describe what they want in plain language and get a working query back. See Set up the AI assistant, coming next!
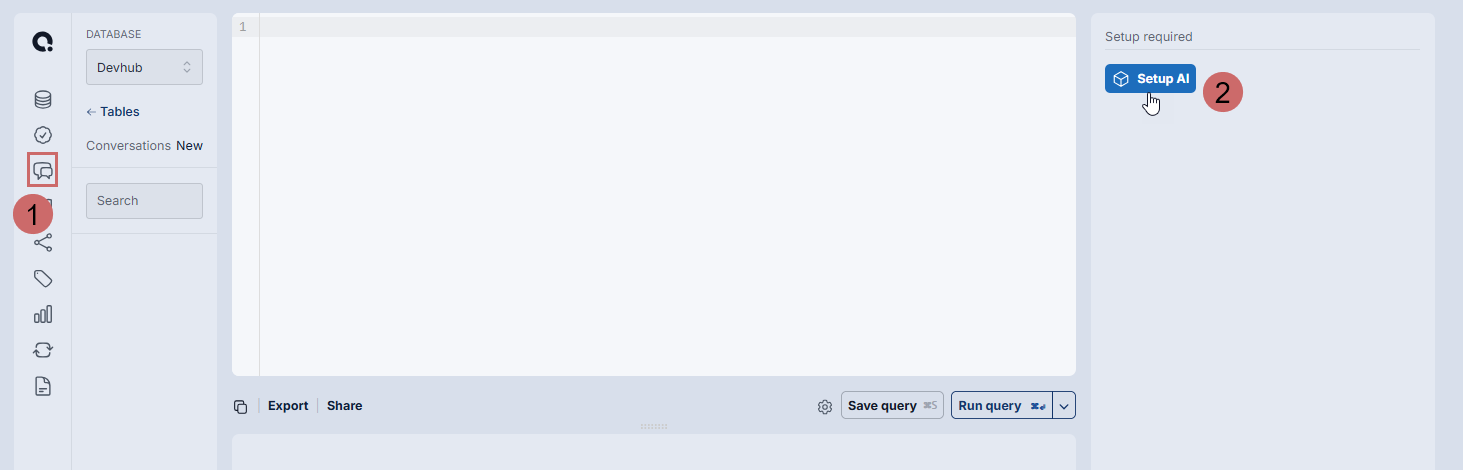
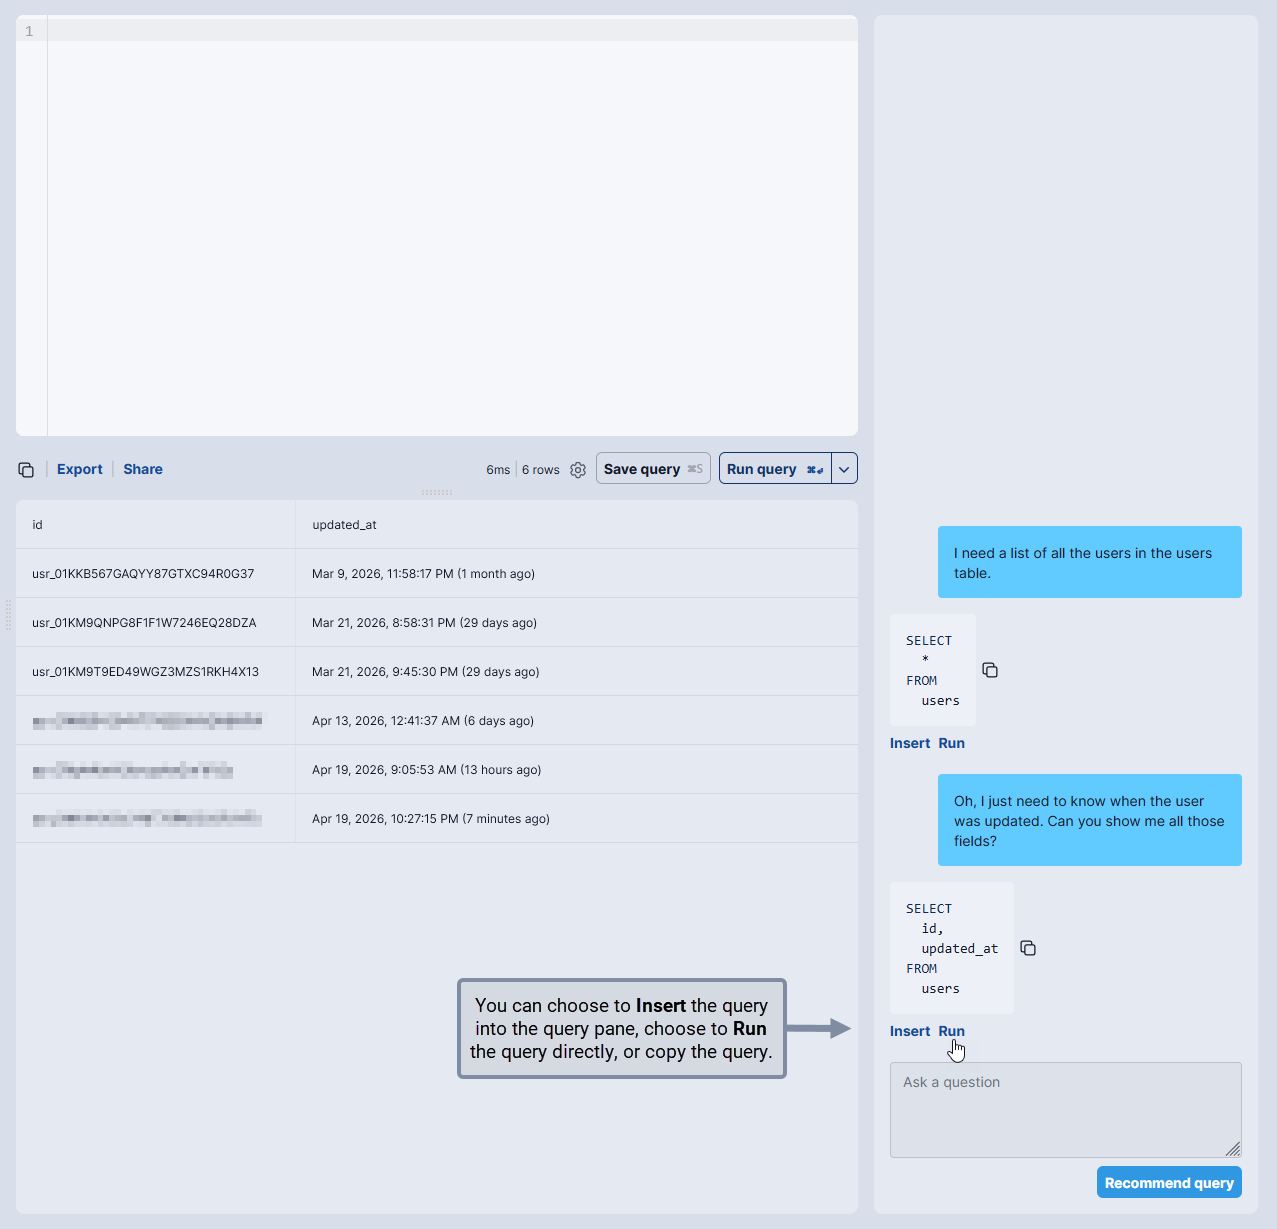
Set up the AI assistant
The AI assistant lets anyone on your team describe what they want in plain language and get a query back, without needing to know SQL. Rather than shipping a built-in model, QueryDesk has you bring your own: you supply an API key for an AI provider you already trust, and prompts and responses flow directly between your QueryDesk instance and that provider — so you stay in control of where your data goes and which vendor policies apply. One AI model can be configured per QueryDesk instance.
QueryDesk makes the AI schema-aware for your specific databases, so the generated queries match the tables and columns you actually have.
Click AI assistant in the left navigation (1), then click Setup AI (2).
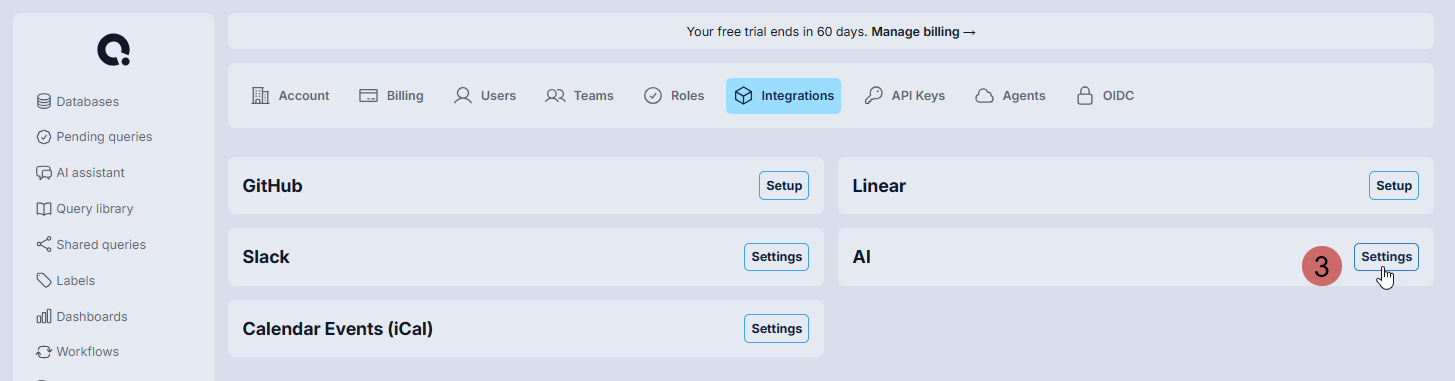
This opens Settings. Navigate to the Integrations tab and click Settings next to AI (3).
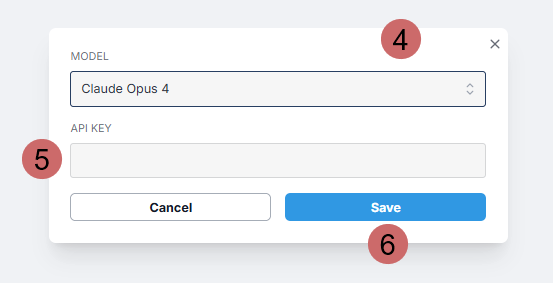
Select a model from the Model dropdown (4), enter your API key for that model (5), and click Save (6).
Once saved, return to the AI assistant in the left navigation to open a conversation. Describe what you want to query in plain language. The assistant will generate SQL that you can run or edit before executing. Because your database schema is attached as context on every request, the suggestions are tailored to your specific databases without any training step on your part.
Adding users to approve queries
To test the approval functionality and user setup, it is recommended to set up another user. The process is as follows:
It is not strictly necessary to set up another user in order to test approvals. As a super admin, you can both submit a query for approval and approve it. Obviously, this is not a best practice in prod, but it is useful for illustrating how approvals operate.
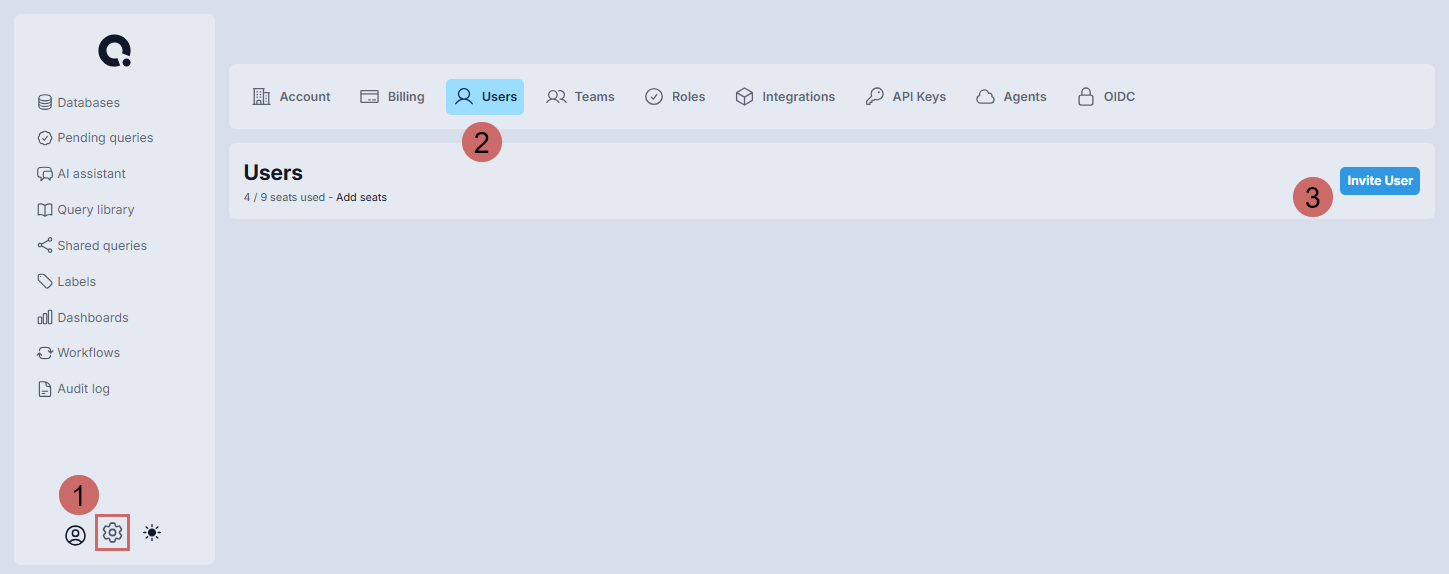
- Click the main Settings gear icon in the left-hand navigation pane.
- Click Users in the Settings ribbon.
- Click the Invite User button.
- In the Invite user window, add the name and email address of the new user and click the Invite button.

- Click Add seats in the Users Settings section to add a seat so the new user has a QueryDesk license.
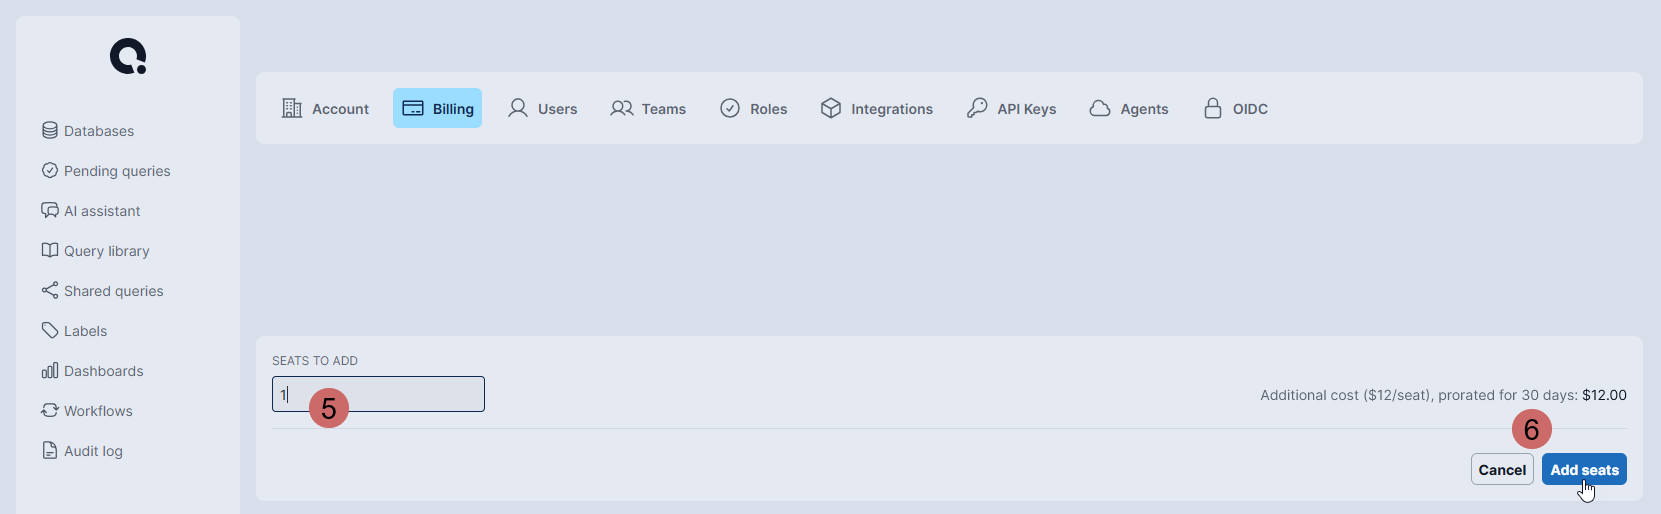
- This opens the Billing Settings page. You will not be charged for this during your trial period.
- Enter the number of seats to add, then click Add seats. Return to the Users Settings page.
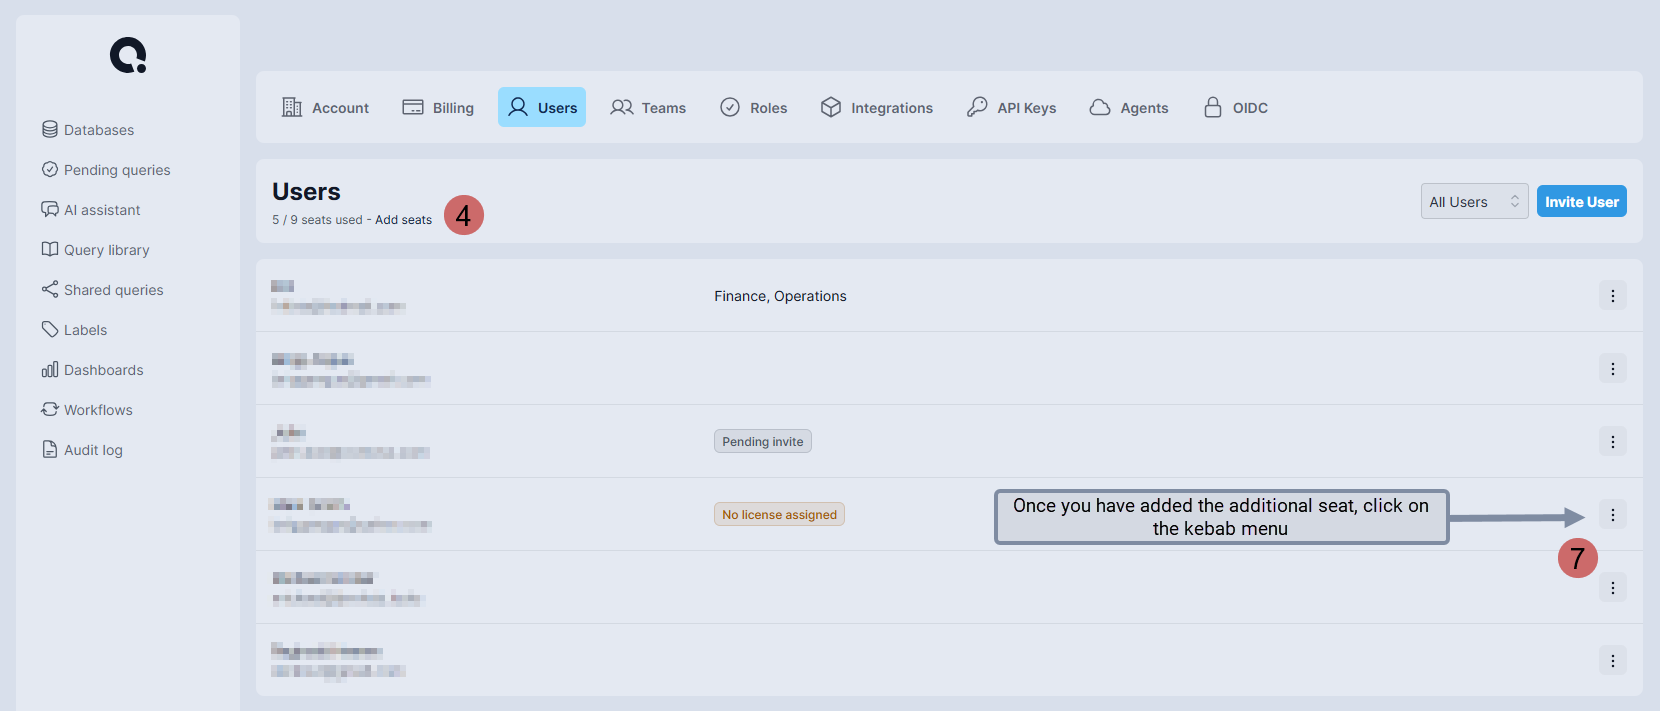
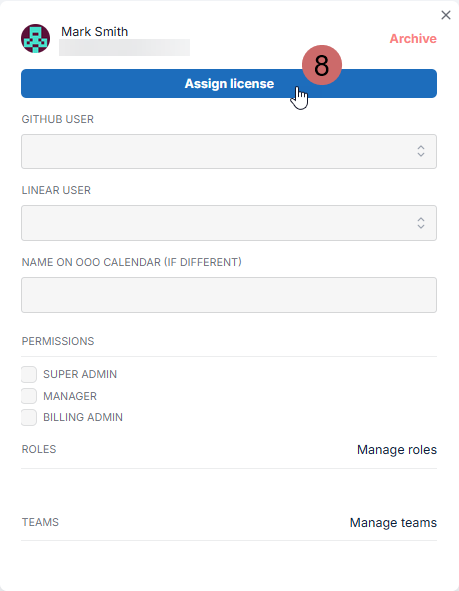
- As shown in the image above, click the kebab menu (⋮) next to the user you added (step 7), then select Assign license. You can make any other changes to the user at this time.
- The user is now ready to join your instance/trial.
Invited users do not receive an email invitation. Invited users must log in using the URL provided at the top of the page. For example:
https://g3flb73q.devhub.cloud or https://<your_company_name>.devhub.cloud
- Upon navigating to the trial instance URL, the new user will be prompted to log in and create an account. Once that process is completed, the user will be directed to the trial instance.
If you are testing this as a single user, make sure to use a different browser or private browsing window to avoid logging into the same session as the original user.
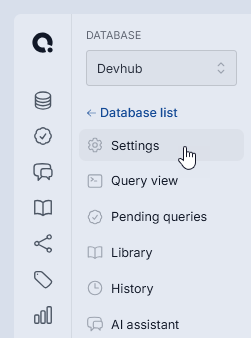
- Once the new user has logged in, Connect to the Devhub database again and select Settings from the database menu.
- Once in the database Settings, scroll down to RBAC (Role-Based Access Control) and click Add user.
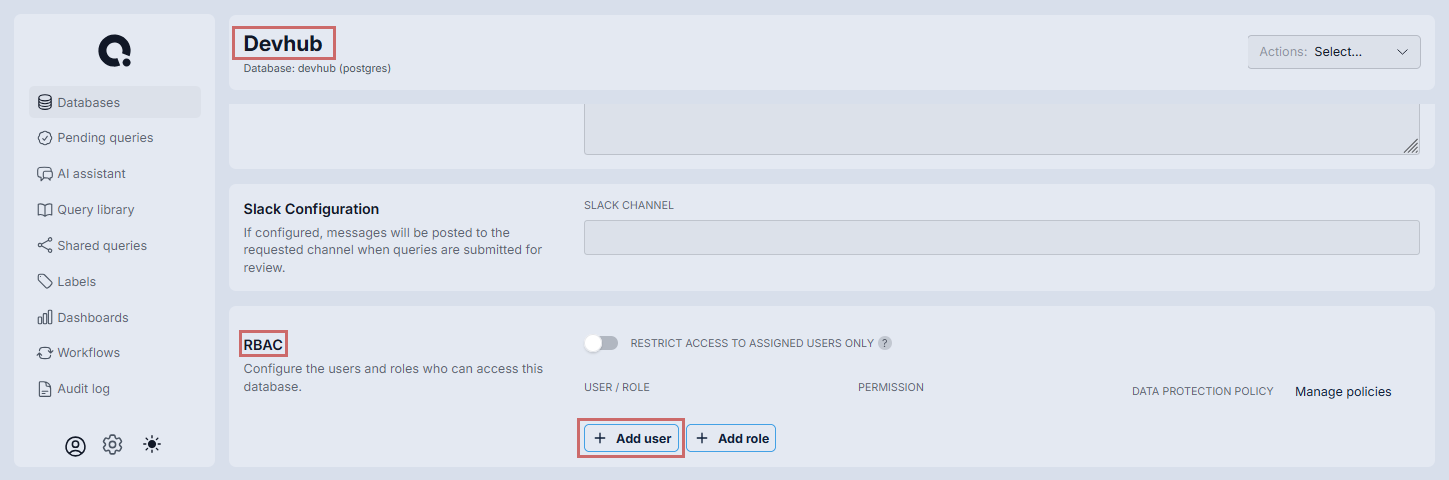
- In the Assign User dropdown, select the user you want to add and click Add user.
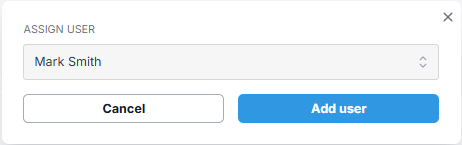
- The new user should now appear in the RBAC section of the Devhub database settings. Select the Permission dropdown and choose Approver. This user can now approve queries.

Submit a query for approval
The Devhub database comes pre-configured with two credentials:
- devhub_readonly: a read-only user. Queries run immediately with no review required, as the user only has read-only access to the database.
- devhub: a read/write user. Queries require one approval before they execute.

This two-credential setup reflects a recommended best practice: a read-only credential for unrestricted data exploration, and a read/write credential with a review gate on any query that can modify data.
You can have as many reviews in the Reviews field as you have approvers. For example, setting Reviews to 5 instead of 1 would require 5 separate approvals from 5 separate reviewers.
To see the approval flow in action:
- Click the dropdown arrow next to Run query and set Run as to
devhub. - Type a query in the query pane. A simple
SELECTstatement is fine. - Click Request review.

Because the devhub credential requires one review, the query is not executed immediately. It is submitted to the Pending queries queue instead. Both the submitting user and the reviewer can access the pending query via Pending queries in the left-hand navigation.
Approve a pending query
Click Pending queries in the left navigation. Your submitted query appears here.
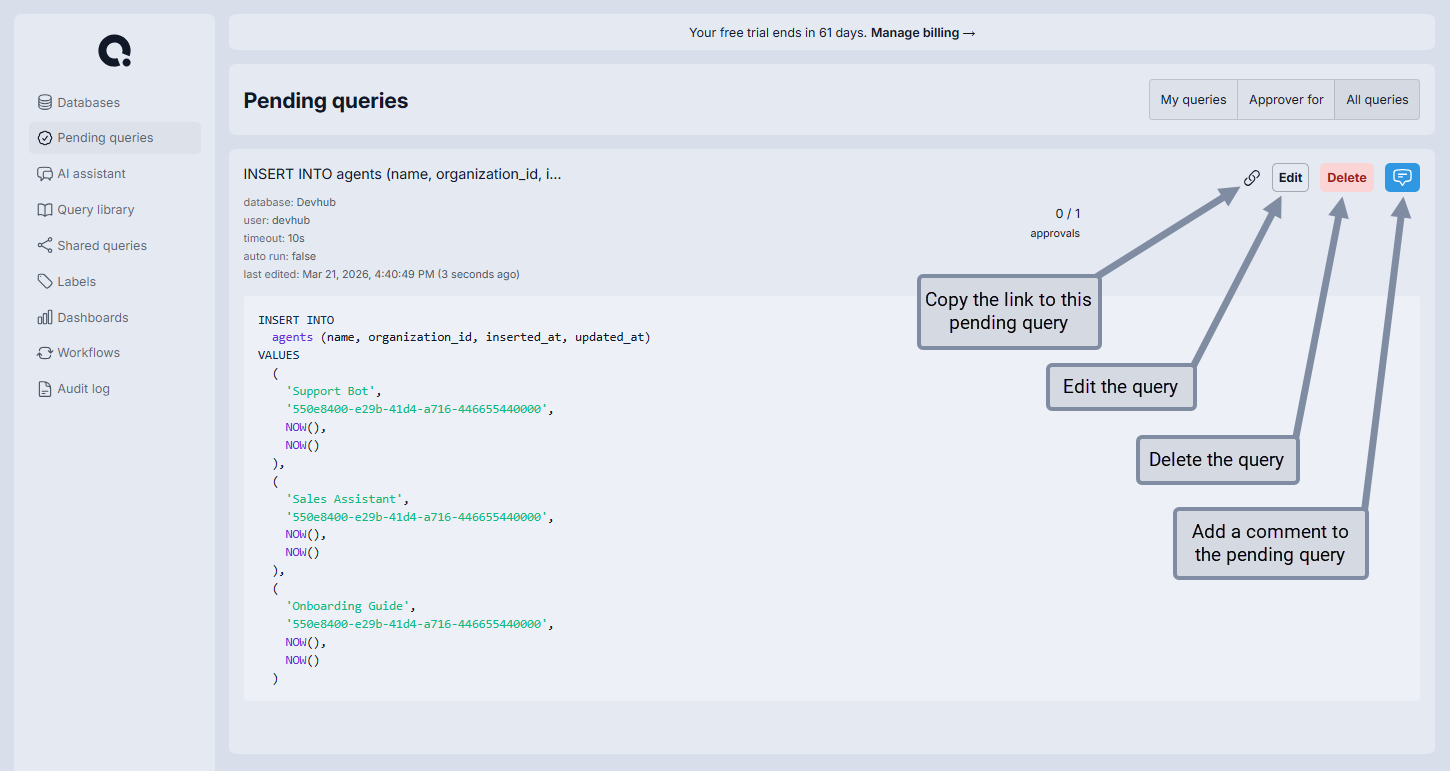
Each pending query displays the database and credentials it will run against, the timeout setting, when it was last edited, and the full query text.
From this view, the submitting user can:
- Click the link icon to copy the link to the clipboard
- Click Edit to modify the query
- Click Delete to discard it
- Click the comment icon to comment on the query
The second user you created in Adding users to approve queries above will act as the approver. When that user checks Pending queries, they will see the following:
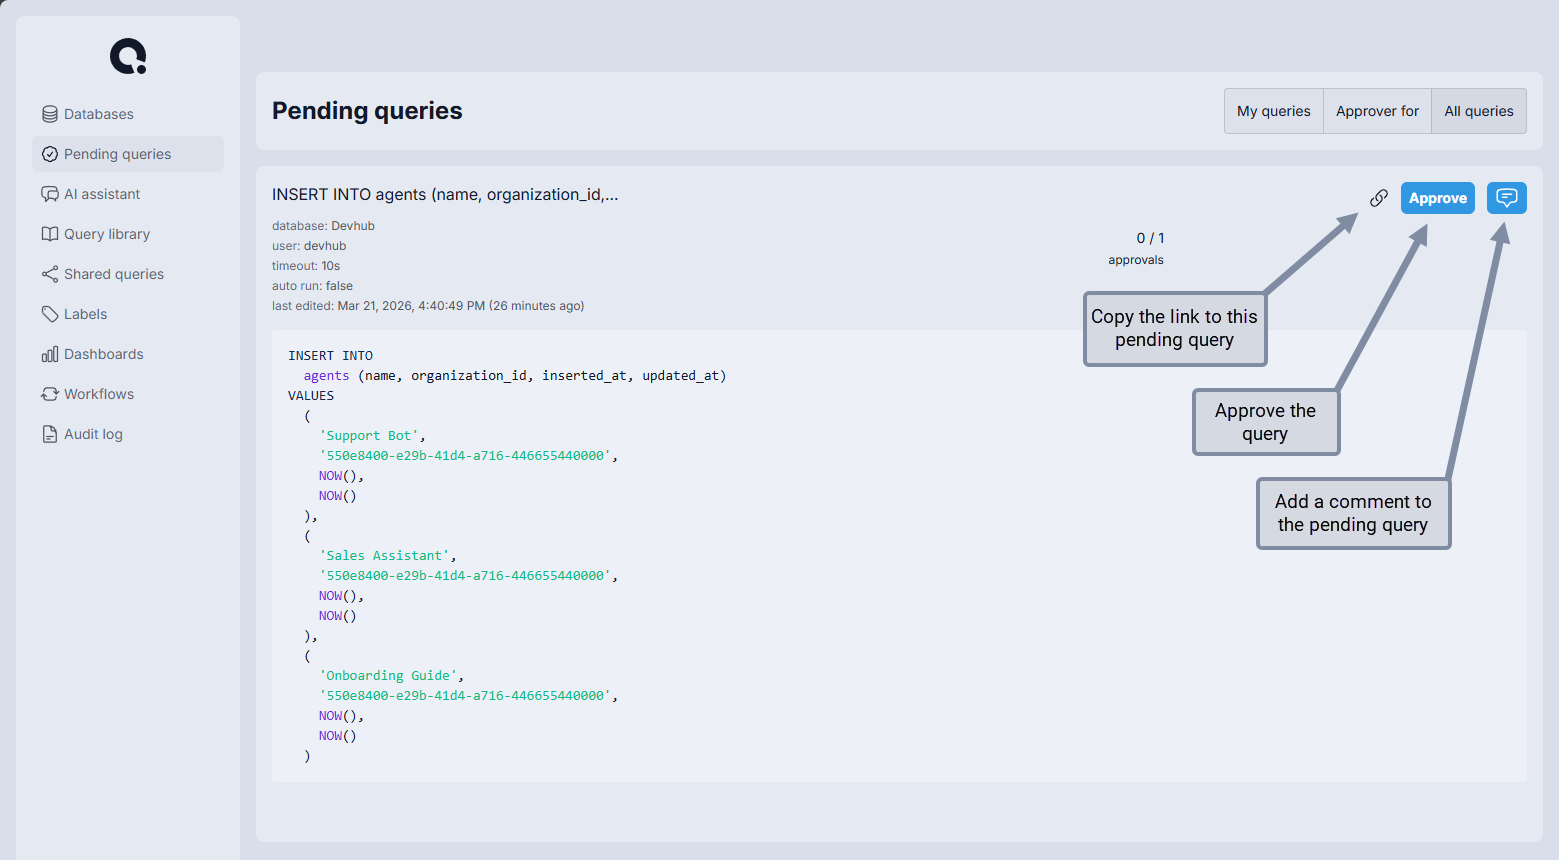
From this view, a user with approver permissions can:
- Click the link icon to copy the link to the clipboard
- Click Approve to approve the query (note that approving does not execute the query)
- Click the comment icon to comment on the query
Once the query has been approved, the original submitting user will see a Run Query button appear on that query in their Pending queries list. Click Run Query to execute it.

Once a query has been run, it is removed from the Pending queries view.
When your team uses QueryDesk in production, this separation between submitter and approver is the intended workflow. A user submits a write query; an engineer, DevOps lead, or designated approver reviews it before it runs. Queries that pose a real risk to production data don't execute until at least a second set of eyes clears them.
Check the audit log
Click Audit log in the left navigation.
Every query that ran during this session is captured here: the database it ran against, the user and credentials, the timestamp, and the full query text. The queries you ran as devhub_readonly are here. So is the query you submitted and approved as devhub.
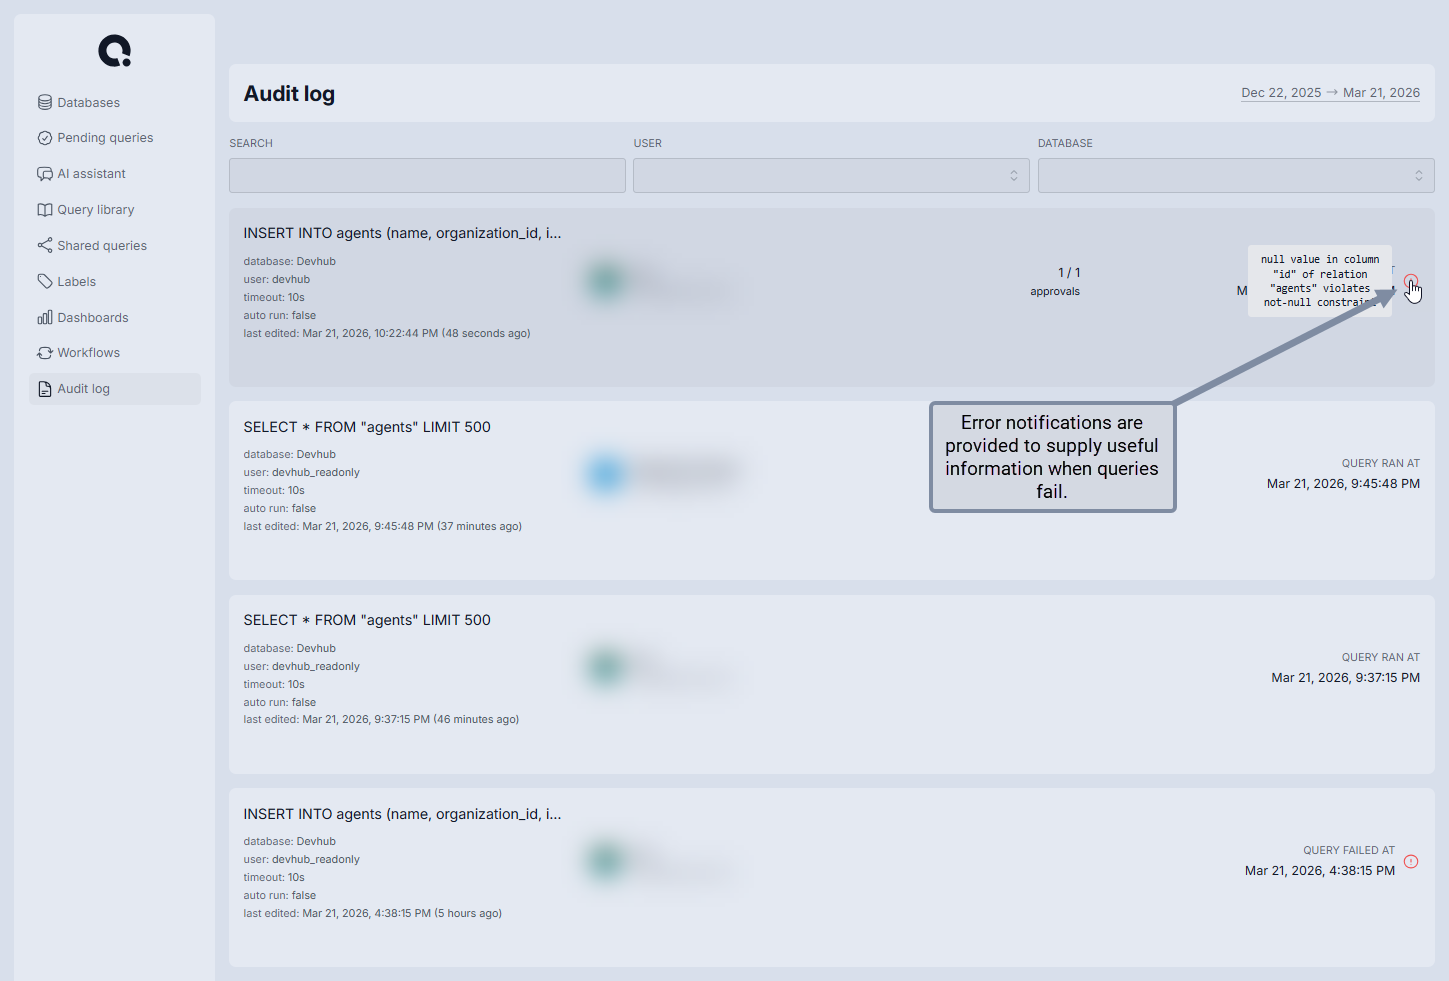
No configuration required. The audit log is always on. Watching. Waiting.
During a SOC 2 audit or an internal security review, this record is immediately available. There is no manual log reconstruction and no hunting across systems; every access event is captured automatically. You can also feed this log into your existing security tooling.
Connect your own database
The Devhub database covers everything you need to evaluate QueryDesk's core features. When you're ready to connect a real database, click New database in the upper right of the Databases page.
If you don't have the connection details (hostname, port, database name, and credentials), get them from your IT, DevOps, Engineering, or Operations team before starting this step.
Database configuration
- Display name - any name that's useful to you.
- Database IP or hostname - the IP address or hostname only. For example:
10.1.0.132ormyproddatabase.123456789.us-east-1.rds.amazonaws.com. - Port - the port for your database type. Leave blank to use the default for the selected type.
- Database name - the actual database name, not the display name. For MySQL, this is the schema name.
- Database type - select from: PostgreSQL, MySQL, ClickHouse, SQL Server, Oracle, etc.
- Agent - used to connect to databases inside a private network. Agents are configured in Settings. If you're unsure whether your database requires one, ask your IT, DevOps, or Engineering team.
- Group (optional) - groups multiple databases together in the Databases list.
Credentials
Click + Add Credential to add at least one set of database credentials.
- Username - the database username.
- Password - the password for that user.
- Hostname (optional) - overrides the database-level hostname for this credential if needed.
- Reviews -
0executes queries immediately. Any other number holds queries in the pending queue until that many approvals are collected. A user with read-only access would typically be set to0. - Default - when checked on a credential with Reviews set to
0, this credential is used by default for table views and proxy connections.
Create two credentials: a read-only user with Reviews set to 0, and a read/write user with Reviews set to 1 or higher. The Devhub database uses exactly this pattern.
Click Test Connection after entering credentials to verify that QueryDesk can reach your database before saving.
Encryption
If your database requires encryption, enable it with the toggle. You can then paste the server CA certificate, client key, and client certificate (which may be optional depending on your database configuration). Work with your IT, DevOps, or Engineering team if you need help obtaining these.
Slack configuration
If you've connected Slack in Settings, enter a channel name here — for example, #prod-query-approvals. Query submission notifications will be sent to that channel when a query is pending review.
Access control
By default, any user in your QueryDesk organization can run queries against a connected database, subject to any data protection policies in place. To restrict access to specific users or roles only:
- Enable Restrict access on the database settings page.
- Click Add user or Add role to assign access.
- For each user or role, set a Permission (the default options are Run Queries and Approver) and optionally assign a Data protection policy.
Users are managed in Settings > Users. Roles are managed in Settings > Roles. Data protection policies are managed via the Manage policies link in the access control section of the database settings page.
Connect
Once the configuration is complete, open the Actions menu in the upper right of the database settings page and select Connect.
What's next
With the Devhub database explored and your own database connected, you've covered how QueryDesk handles the fundamentals: unified database access, controlled write operations with approval flows, and automatic audit logging. The following areas are worth exploring next:
- Integrations: connect Slack, Linear, AI, and GitHub to your QueryDesk instance to enable workflows.
- Workflows: automate multi-step processes by chaining database queries, API calls, Slack notifications, and human approvals into a single, repeatable operation.
- Data protection: configure field-level masking policies that control which columns are visible to which users, enforced automatically at query execution time so sensitive data stays in your database.